Showing posts with label Webserver. Show all posts

Friday, January 9, 2015

IHS Log Rotation

This topic is about how to rotate the log , means how to generate a new log day by day with file size 5MB.


Making IBM HTTP Server Logs Rotates/Rolls Dialy


IBM HTTP Server has many Logs for it under Folder "<Installation_Directory>/IBM/HTTPServer/logs", sometimes those logs take much more time to open if they were too large and logged many data, you can customize those log files , we can say that defaults log in IBM HTTP Server are:


image
  1. Admin Log : admin_access.log
  2. Admin Error Log : admin_error.log.
  3. Access Log : access_log.
  4. Error Log : error_log.
In This tutorial we well represent how to make "Access log and Error Log" Rolling By Day and by Size :
Note : This tutorial in IBM HTTP Server v8.5 and Red hat Linux , take care when implementing it on other OS's

Steps in Appending the Logs it seems Like Apache Http Server :


  1. Locate IBM HTTP Server in <Installation_DIR>/IBMHTTPServer/conf in Your Operating System, to edit the configuration.
  2. Then Open httpd.conf.

    image


  3. Locate the line : CustomLog log/access_log common.
  4. Comment the line, after this line type :

    CommonLog "|/opt/IBM/HTTPServer/bin/rotatelog -l /opt/IBM/HTTPServer/log/access_log.%Y.%m.%d 5M" common
    Where"y"represents Year, "m" for month, "d" for date and "5M" for 5MB files size.
    image

     
  5. Locate the Line : ErrorLog log/error_log.
  6. Comement the Line and press enter and Enter the Code Below instead the current one :

    ErrorLog "|/opt/IBM/HTTPServer/bin/rotatelog -l /opt/IBM/HTTPServer/log/error_log.%Y.%m.%d 5M"

    image

     
  7. Then Restart IBM HTTP Server .
  8. Type the URL  for the Host for IBM HTTP Server from Browser and you can see the access log is logging by the Current date.

    image

For Every 5 minutes an new log will be generated and the old log will be saved as above 

References :

rotatelogs - Piped logging program to rotate Apache logs  is a simple program for use in conjunction with Apache's piped logfile feature. It supports rotation based on a time interval or maximum size of the log

Monday, December 1, 2014

Monitor Apache Web Server Load and Page Statistics

Monitor Apache Web Server Load and Page Statistics

As a System Admin it becomes very important to check the Apache server statistics for performance and troubleshooting any issues
Apache’s mod_status can be used to provide these details
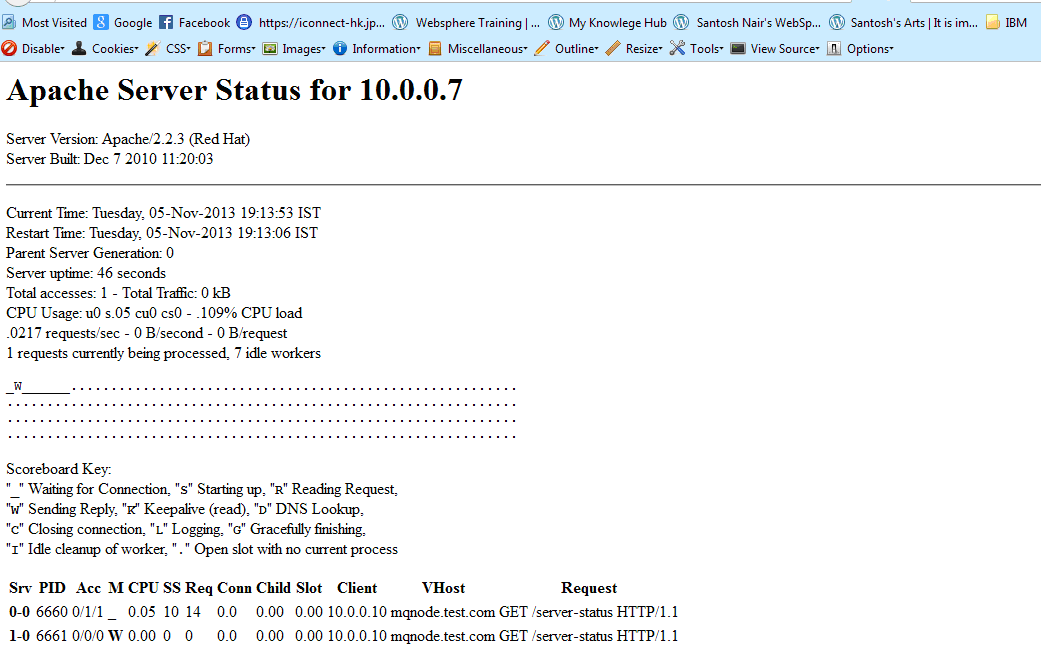
Apache’s mod_status shows a plain HTML page containing the information about current statistics of web server state including.
  •     Total number of incoming requests
  •     Total number of bytes and counts server
  •     CPU usage of Web server
  •     Server Load
  •     Server Uptime
  •     Total Traffic
  •     Total number of idle workers
  •     PIDs with respective client and many more.
By default the status page is disabled to hide internal information from unauthorized users.
=======================================================================================
Enable mod_status in Apache
The default Apache installation comes with mod_status enabled
To validate it .
a) login in to the Apache server
b) Navigate to the Apache configuration file ie /etc/httpd/conf/httpd.conf
[root@mqnode AppServer]# vi /etc/httpd/conf/httpd.conf
c) Search for the word “mod_status”
#LoadModule status_module modules/mod_status.so
If its commented then uncomment it
d) Restart the apache instance using
[root@mqnode AppServer]# service httpd stop
Stopping httpd:                                            [  OK  ]
[root@mqnode AppServer]# service httpd start
Starting httpd:                                            [  OK  ]
=======================================================================================
Configure server-status
1) Login the the Apche Server
2)Open the /etc/httpd/conf/httpd.conf
3) Search for server-status
# Allow server status reports generated by mod_status,
# with the URL of http://servername/server-status
# Change the “.example.com” to match your domain to enable.
#
#<Location /server-status>
#    SetHandler server-status
#    Order deny,allow
#    Deny from all
#    Allow from .example.com
#</Location>
Remove the comment character (“#”) in front of each line.
Be careful about the “Allow from” line.
Here you can customize to put the IP address and fine tune the security to ensure that unauthorized access to server-status url
Recommended to use your IP address that you are connecting from.
You might also want to consider password-protecting this page using htpasswd.
4) We would use the htpasswd for security
5) Setup the htpasswd
[root@mqnode ~]# htpasswd -c /etc/httpd/conf/server-status-htpasswd status
New password:
Re-type new password:
Adding password for user status
[root@mqnode ~]# cat /etc/httpd/conf/server-status-htpasswd
status:hdtkPGbH2G81U
5) Use this  /etc/httpd/conf/server-status-htpasswd within the configurations for server-status inhttpd.conf
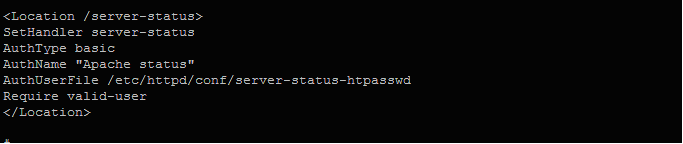
<Location /server-status>
SetHandler server-status
AuthType basic
AuthName “Apache status”
AuthUserFile /etc/httpd/conf/server-status-htpasswd
Require valid-user
</Location>
Screenshot:status_3
6) Enable ExtendedStatus
The “ExtendedStatus” settings adds more information to the statistics page like, CPU usage, request per second, total traffic, etc.
7)  To enable it, edit the the same httpd.conf file and search for the word “Extended” and Uncomment the line and set the status “On” for ExtendedStatus directive.
ExtendedStatus On
8) Restart Apache
[root@mqnode ~]# service httpd restart
Stopping httpd:                                          [  OK  ]
Starting httpd:                                          [  OK  ]
9) Access mod_status Page
http://serveripaddress/server-status
status_1
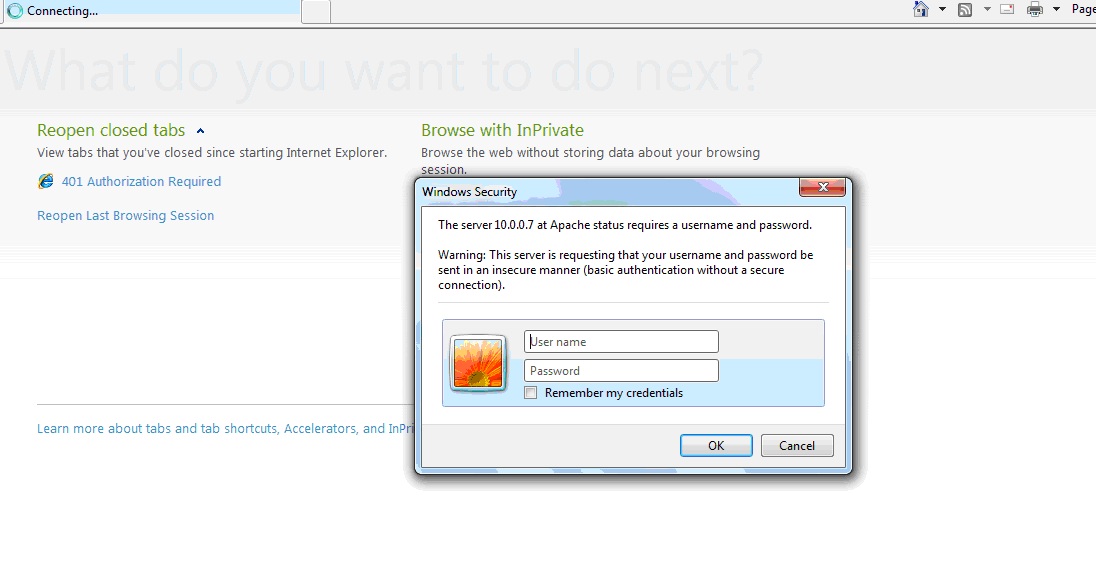
It will prompt for the user name and password. Enter the Details
status_2

Monday, February 22, 2010

Web server support

Web server support


WebSphere Application Server provides Web server plug-ins that work with a Web server to route requests for dynamic content, such as servlets, from the Web server to the proper application server. A Web server plug-in is specific to the type of Web server. It is installed on the Web server machine and configured in the Web server configuration.

A plug-in configuration file generated on the application server and placed on the Web server is used for routing information. In order to manage the generation and propagation of these plug-in configuration files, Web servers are defined to the WebSphere Application Server configuration repository. In some cases, Web server configuration and management features are also available from the WebSphere administrative tools.

The following are the supported Web servers for WebSphere Application Server

V6.1:
•Apache HTTP Server

•Domino Web Server

•IBM HTTP Server

•Microsoft Internet Information Services

• Sun Java System Web Server (formerly Sun ONE and iPlanet)


Unmanaged and managed web server

Unmanaged web server


Unmanaed web servers reside on a System without a node agent. This is the only option in a standalone server environment and is a common option for Web Servers installed outside a firewall. The use of this topology requires that each time the plug-in configuration file is generated, it is copied from the machine where WebSphere Application Server is installed to machine where the server is running.

If the Web server is defined to an unmanaged node, you can do the following:

1.Check the status of the Web server.

2.Generate a plug-in configuration file for that Web server.

3.If the Web server is an IBM HTTP Server and the IHS Administration server is

installed and properly configured, you can also:

◦Display the IBM HTTP Server Error log (error.log) and Access log (access.log) files.

◦Start and stop the server.

◦Display and edit the IBM HTTP Server configuration file (httpd.conf).

◦Propagate the plug-in configuration file after it is generated.

You cannot propagate an updated plug-in configuration file to a non-IHS Web server that is defined to an unmanaged node. You must install an updated plug-in configuration file manually to a Web server that is defined to an unmanaged node
 
Managed web server


In a distributed server environment, you can define multiple Web servers. These

Web servers can be defined on managed or unmanaged nodes. A managed node

has a node agent. If the Web server is defined to a managed node, you can do

the following:

1.Check the status of the Web server.
2.Generate a plug-in configuration file for that Web server.
3.Propagate the plug-in configuration file after it is generated.
4.If the Web server is an IBM HTTP Server (IHS) and the IHS Administration

server is installed and properly configured, you can also:

◦Display the IBM HTTP Server Error log (error.log) and Access log

(access.log) files.

◦Start and stop the server.

◦Display and edit the IBM HTTP Server configuration file (httpd.conf)
 
################################################################################

Remote Web server on an unmanaged node

Remote Web server on an unmanaged node

The deployment manager and the Web server are on separate machines. The script that defines the Web server is run against the deployment manager and you will see an unmanaged node created for the Web server node. In this case there wont be a node agent on the web server machine


Assuming that the Deployment manager is already installed on Machine B follow these steps

1.Install the Web server on machine B.

2.Install the Web server plug-in on machine B by performing the following

steps:

◦Select Remote installation.

◦Enter a name for the Web server definition. The default is webserver1.

◦Select the location for the plug-in configuration file. By default, the file will be placed in the directory that contains the server's configuration. For example, when the name specified for the Web server definition in the previous step is webserver1, the default location for the plug-in file is:

/config/webserver1/plugin-cfg.xml

During the installation, the following tasks are performed:

◦A temporary plug-in configuration file is created and placed in the location specified.


◦The Web server configuration file is updated with the plug-in configuration, including the location of the plug-in configuration file.

◦A script is generated to define the Web server and an unmanaged node to

WebSphere Application Server. The script is located in: /bin/configure

3.At the end of the plug-in installation, you need to copy the script to the

/bin directory of the deployment manager machine (machine A),

start the deployment manager, and execute the script.

When the Web server is defined to WebSphere Application Server, the plug-in configuration file is generated automatically. For IBM HTTP Server, the new plug-in file is propagated to the Web server automatically. For other Web server types, you need to propagate the new plug-in configuration file to the Web server.

Creating web werver definition in WAS Admin console

Creating web werver definition in WAS Admin console

During the installation of the plug-in, the Plug-ins installation wizard creates a Web server configuration script named configure. This configuration script is used to create the Web server definition and, if necessary, the node definition in the configuration of the application server.


Each stand-alone application server can have only one Web server definition. A distributed server environment, on the other hand, can have multiple Web server definitions. The script creates a new Web server definition unless the Web server name is the same.

The Plug-ins installation wizard stores the script in the /bin

directory on the Web server machine. If the plug-in is installed locally (on the same machine as the application server), the configuration script will be run automatically. For remote installations, you must copy the script from the Web server machine to the /bin directory on the application server machine for execution. The script runs against the default profile. If one machine is running under Linux or UNIX and the other machine is running under Windows, use the

script created in the /bin/crossPlatformScripts directory.

I tried this in my local environment, after installing plug-in i copied the configurewebserve1.bat from plug-in _home/bin directory and to the DMGR_HOME/bin directory and executed it. It took few minutes to execute and i could see this output


After that i logged into the WAS Admin Console and went to Servers - Web Servers, i could see webserver1 being added in there


When i clicked on the webserver1 i could see the details on the webserver1, such as location of web server installation, location of httpd.conf file,


If i click on the Plug-in properties link on the web server definition i can see the plugin related details, such as location of plugin installation, location of plugin-cfg.xml,..


#############################################################################