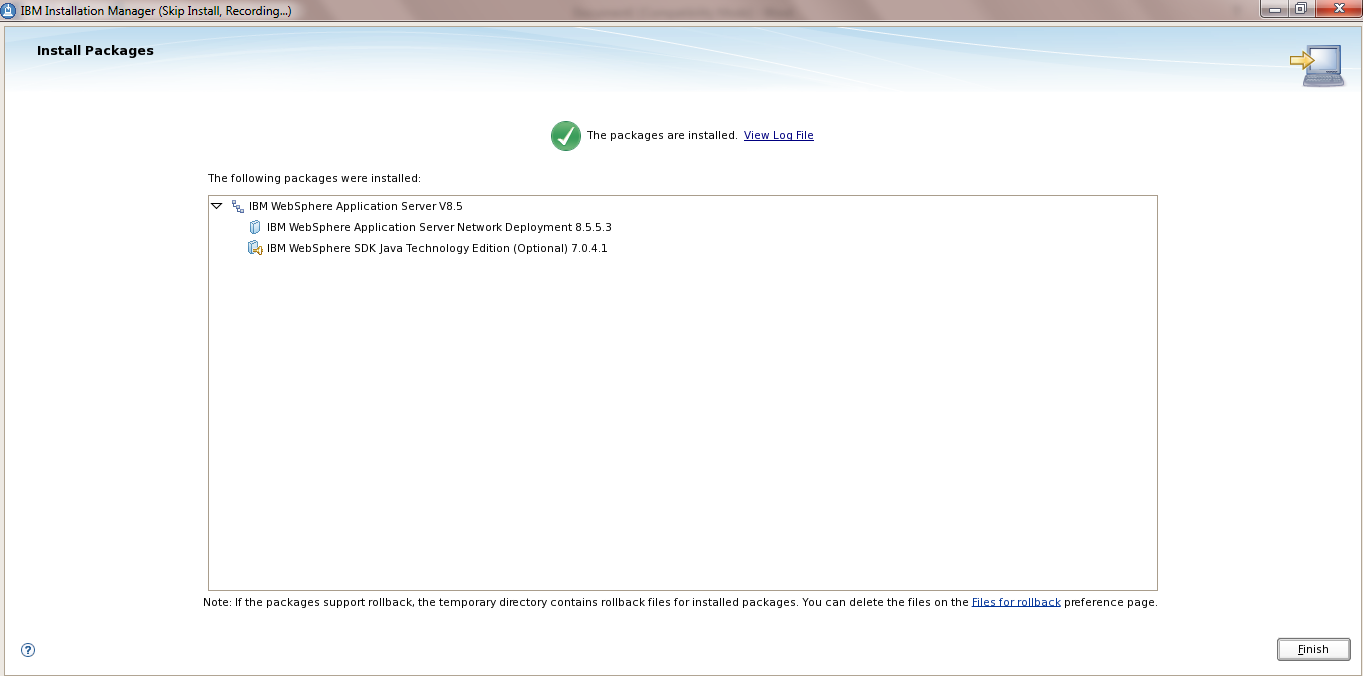
File-based repository Creation and configuration
Security is paramount for the Websphere Application server Environment
Global Security
a) Global security is enabled to secure your WAS server, but it requires a user registry.
b) A user registry contains the user and group names for authentication and authorization purposes.
c) When we configure it , the application server will connect to the registry and perform lookups to acquire user credentials used in areas where authorization is required.
There are four types of registry
Standalone custom registry :
Standalone custom registry Allows a custom registry that is essentially based on Java
code implementation.
Standalone custom registry :
Standalone custom registry Allows a custom registry that is essentially based on Java
code implementation.
Local operating system :
Local operating system Specified the registry for the local OS.
Local operating system Specified the registry for the local OS.
Standalone LDAP registry :
Standalone LDAP registry Only used LDAP defined users and groups and required
Standalone LDAP registry Only used LDAP defined users and groups and required
Federated repositories :
Federated repositories Manages users and groups across multiple repositories
using a virtual realm. The registries can also be made up
of the combinations of the other registry types.
File-based repository Creation and configuration
Step 1 : Create the user registry property file
This file will have the users with the password and the details of the user like userid and group id
a) Create a folder called <was_root>/fileRegistry on our Linux box
b) Create a file called user.props with contents placed below
# Format:
# name:passwd:uid:gids:display name
# where name = userId/userName of the user
# passwd = password of the user
# uid = uniqueId of the user
# gid = groupIds of the groups that the user belongs to
# display name = a (optional) display name for the user.
wasadmin:wasadmin:101:101:WebSphere Administrator
Step 2 : Create the Group registry property file
a) In the folder <was_root>/fileRegistry create a file called groups.props and the contents of the file
will be as follows:
# Format:
# name:gid:users:display name
# where name = groupId of the group
# gid = uniqueId of the group
# users = list of all the userIds that the group contains
# display name = a (optional) display name for the group.
admins:101:wasadmin:Administrative group
NOTE: Ensure that any new files you create are assigned appropriate rights using chmod and chown to ensure WebSphere processes can read the file.
NOTE : Add additional users like wasmon , wasops etc on these user.props and groups.props files
NOTE : Add additional users like wasmon , wasops etc on these user.props and groups.props files
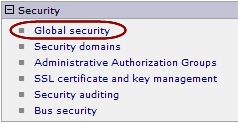
Step 3: Turning on global security
To turn on global security,
a) Log in to the Admin console
b) Navigate to the Security
c) Click Global security, as shown in following screenshot
To turn on global security,
a) Log in to the Admin console
b) Navigate to the Security
c) Click Global security, as shown in following screenshot

Step 4: Security Configuration Wizard
WebSphere has a wizard to set up basic security using an internal repository.
WebSphere has a wizard to set up basic security using an internal repository.
Click the Security Configuration Wizard button as shown in the previous
screenshot.
screenshot.
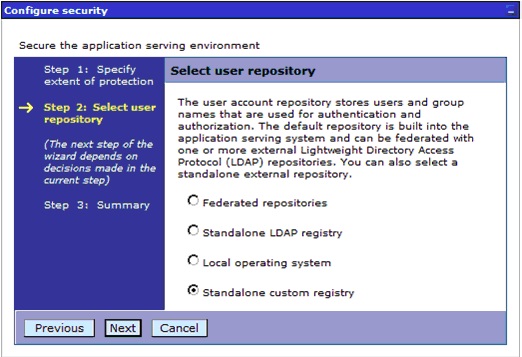
Step 5: Standalone custom registry
a) Start by selecting Standalone custom registry during our use of the Global security
wizard, as shown in the following screenshot:
a) Start by selecting Standalone custom registry during our use of the Global security
wizard, as shown in the following screenshot:
Step 6: The Configure standalone custom registry page,
a) Type wasadmin in the Primary administrative user name and add two properties.
b) The usersFile property will point to the users.props file
c) The groupsFile property will point to the location of the groups.props file
b) The usersFile property will point to the users.props file
c) The groupsFile property will point to the location of the groups.props file
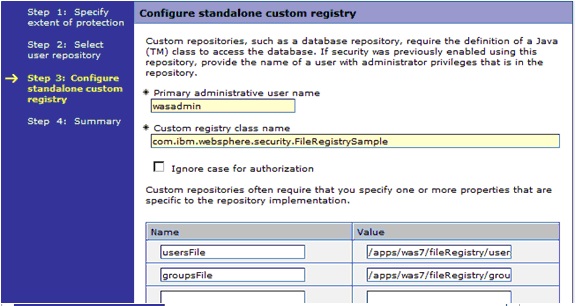
Step 7 : Custom registry class name
Custom registry class name is already filled in with a Java class that exists in the
internals of WebSphere that contains the code for WebSphere to use the user.props
and groups.props files.
Custom registry class name is already filled in with a Java class that exists in the
internals of WebSphere that contains the code for WebSphere to use the user.props
and groups.props files.
Step 8: Complete the Configurations
Click Next to view the summary, and then click Finish to complete your file-based repository.
Click Next to view the summary, and then click Finish to complete your file-based repository.
Step 9 : Restart the Websphere Server
a) Stop Application Server
<was_profile_root>/bin/stopServer.sh server1
b) Start Application Server
<was_profile_root>/bin/startServer.sh server1
<was_profile_root>/bin/stopServer.sh server1
b) Start Application Server
<was_profile_root>/bin/startServer.sh server1
Step 10: Login to the Admin console
Once global security is enabled, log in to the standard login URL
http:Hostname:9060/ibm/console
Once global security is enabled, log in to the standard login URL
http:Hostname:9060/ibm/console

You are being redirected to a secure site and a warning that you have received a Secure Sockets Layer (SSL) certificatefrom an unknown Certificate Authority (CA) will be shown in the browser.
Type wasadmin for the username and wasadmin for the password and click Log in
to gain access to the administrative console.
to gain access to the administrative console.
THIS IS HOW WE WILL CONFIGURE THE FILE BASED REPOSITORY